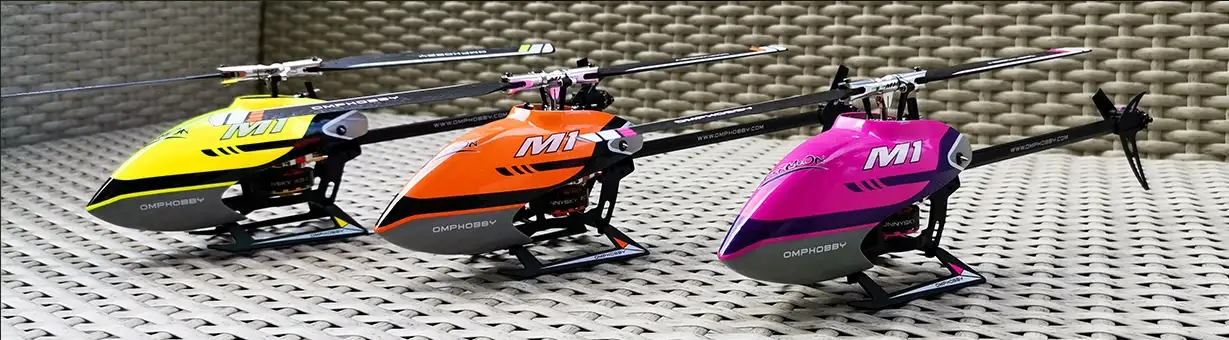
Remote-controlled (RC) helicopters have long been a source of fascination and excitement for hobbyists of all ages. The OMP Hobby M2 Evo, with its cutting-edge technology and innovative design, takes this passion to new heights. In this blog post, we ’ll delve into the world of RC helicopters, exploring what makes the OMP Hobby M2 Evo so remarkable and why it ’s become a top choice for enthusiasts. Whether you ’re a seasoned pro or a beginner looking to venture into the thrilling world of RC helicopters, the M2 Evo is sure to captivate your imagination.
Work in progress, aim to be the ultimate guide for the OMPHobby M2 EVO, Buy me a coffee
warning
R/C helicopters are not toys. R/C helicopter utilize various high-tech products and technologies to provide superior performance.Improper use of this product can result in serious injury or even death. Please read this manual carefully before using and make sure to be conscious of your own personal safety and the safety of others and your environment when operating all RC Helicopter products. I assume no liability for the operation or the use of this product. Intended for use only by adults with experience flying remote control helicopters at a legal flying field.
tip
Safety is paramount. Always follow safety guidelines, such as not flying near people, animals, or obstacles. Maintain a safe distance from other RC enthusiasts. Wear safety glasses to protect your eyes from debris.
The OMP Hobby M2 Evo: A Closer Look
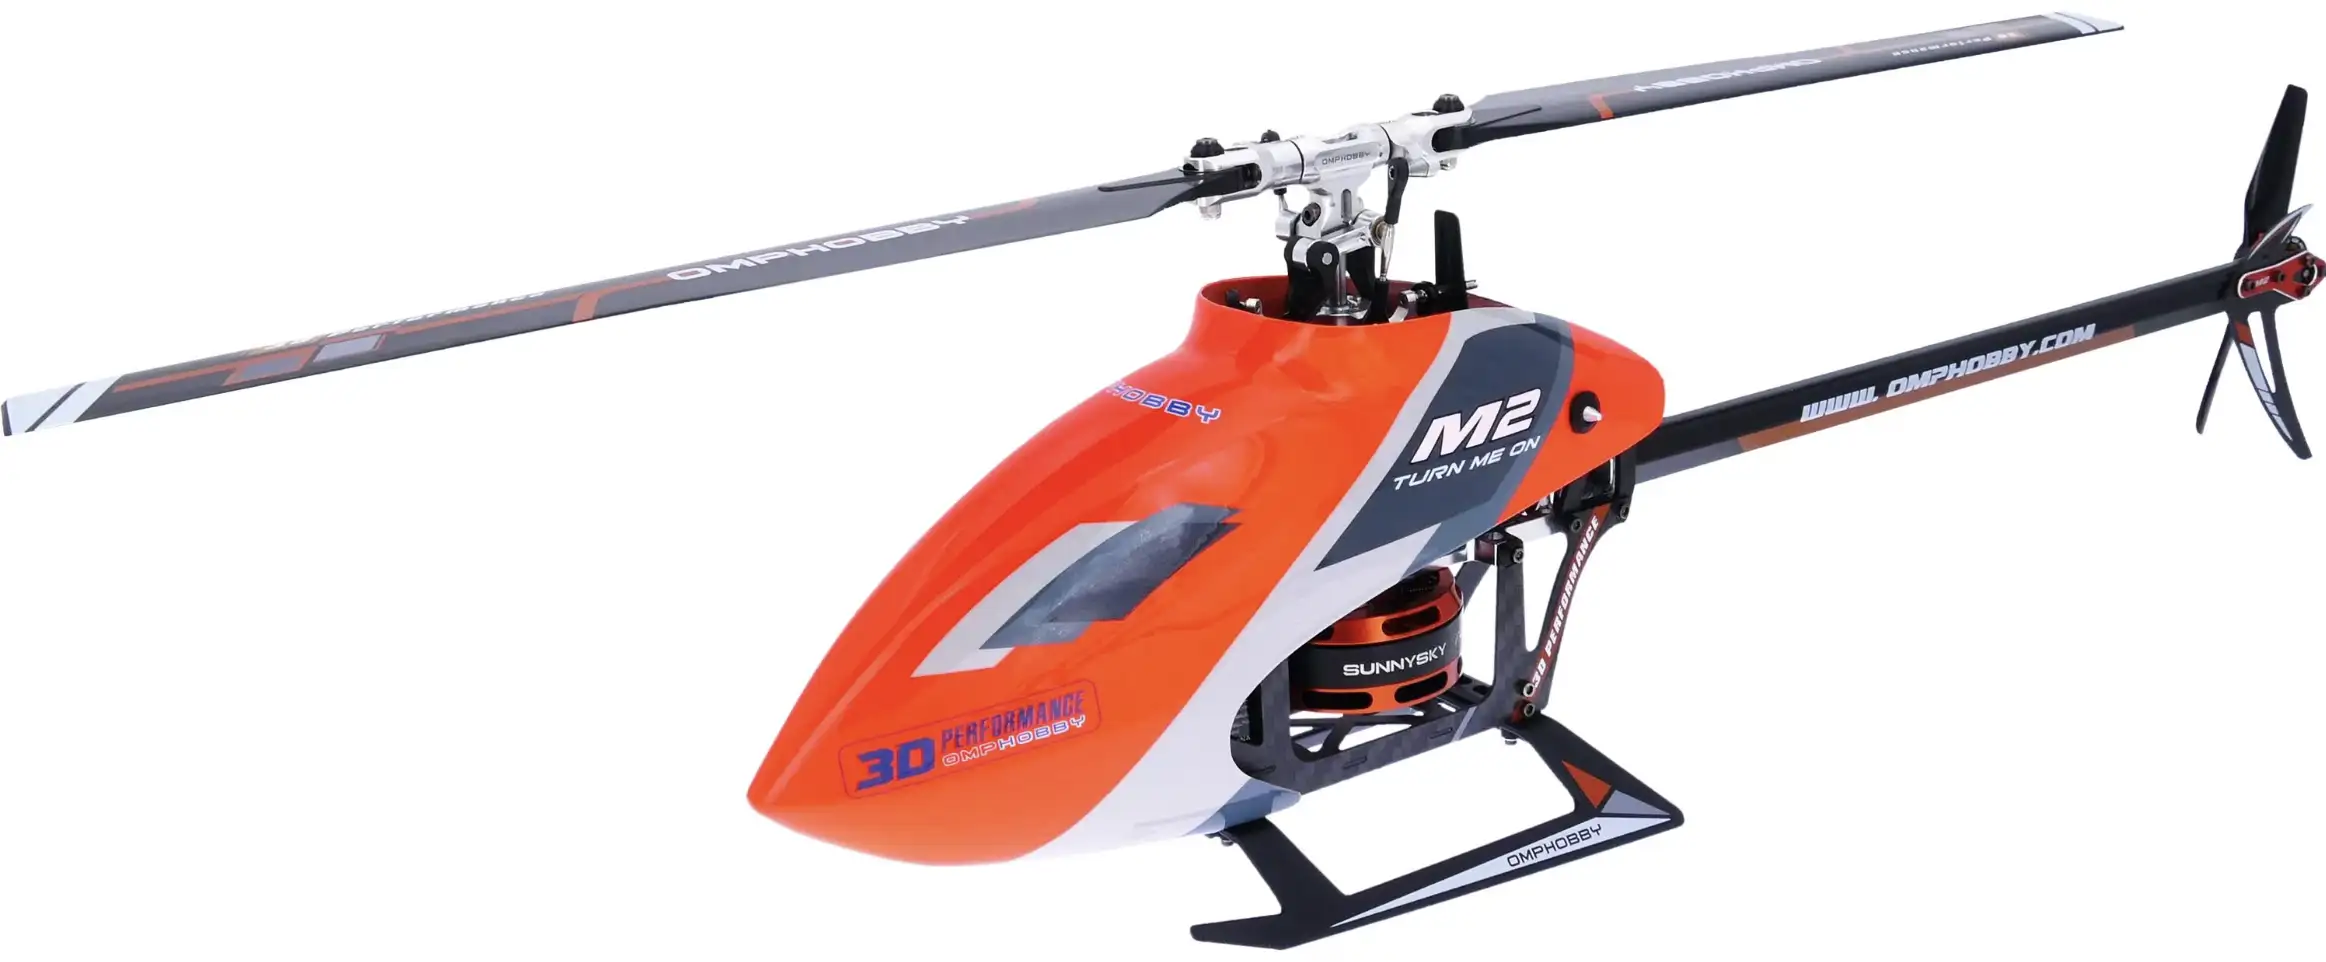
The OMP Hobby M2 Evo is a masterpiece of engineering and design, offering an extraordinary combination of power, precision, and performance. Here’s what sets it apart:
Cutting-Edge Technology
The M2 Evo is equipped with advanced flight control systems, making it incredibly stable and easy to handle, even for beginners. Its 3-axis gyro system and flybarless design enhance stability and control, allowing for a smoother and more enjoyable flight experience.
Durability and Quality
Constructed from high-quality materials and with meticulous attention to detail, the M2 Evo is built to withstand the rigors of RC helicopter flying. It’s not only resilient but also designed for easy maintenance, ensuring your investment will last for years to come.
Power and Precision
The M2 Evo boasts powerful brushless motors that provide ample thrust and agility, allowing for impressive stunts and maneuvers. Its precise control, even in windy conditions, ensures that every flight is an exhilarating experience.
| Dimension|—-| | Long|428 mm| | Width|72 mm| | height|138 mm| | Weight|335 g| | Diameter|434 mm|
What I like
Crash costs are low, the kinetic energy is not so huge.
The manual is great, a chapter about how to repair would be welcome (not only how to put it back together but also what to check)
What I don’t like
The canopy is too fragile, too expensive and difficult to add and remove. I will be printing a TPU version: the Wette canopy that make the M2 look like a SAB Raw 700. You can add and remove the battery without removing the canopy and its design in 4 pieces allow you to replace only what is broken!
Why Choose the OMP Hobby M2 Evo?
Whether you’re new to RC helicopters or an experienced pilot, the M2 Evo caters to all skill levels. Beginners can appreciate the stability and reliability, while experts can push the limits with its advanced features.
RC helicopters offer a unique blend of excitement and relaxation. As you master the controls, you’ll experience the thrill of flight from the safety of the ground, and the M2 Evo elevates that experience to new heights.
The world of RC helicopters is filled with enthusiasts who share your passion. Joining a community of like-minded individuals can enhance your experience, allowing you to learn, grow, and share your love for these incredible machines.
Alternative parts, mods and tricks
Alternate canopy
** Airbrush Fiberglass King Cobra Canopy $24 **

** Self 3D printed $12 for the file then unlimited print for a $1**
** MD 500 scale canopy** https://www.aliexpress.us/item/3256802887648793.html
Alternate battery
3D printing
Setting up the OMP Hobby M2 Evo
Out of the box…
info
OMPHobby does a great job, the helicopter is perfectly setup! just do security checks
It can be a bit complex for beginners, but with proper guidance and patience, it can be an exciting endeavor. Follow these steps to set up your OMP Hobby M2 Evo RC helicopter:
What You’ll Need
- OMP Hobby M2 Evo RC helicopter.
- A compatible RC transmitter (if not included).
- A charged LiPo battery for the helicopter.
- A LiPo battery charger.
- Tools (usually included with the helicopter) for assembly and maintenance.
Setup Steps
Unbox and Inspect: Start by carefully unpacking your OMP Hobby M2 Evo and inspecting all the components. Ensure that everything is in good condition and that no parts are damaged.
Charge the Battery: Charge the included LiPo battery using a compatible charger. Ensure that the charger settings match the specifications of the battery to avoid overcharging or damaging it.
Assemble the Helicopter: Follow the instruction manual that comes with the M2 Evo to assemble the helicopter. This typically involves attaching rotor blades, tail rotor, landing skids, and other components.
Install the Receiver and Bind: If your M2 Evo did not come with a transmitter, you’ll need to purchase a compatible one separately. Install the receiver unit in the helicopter and bind it to the transmitter following the instructions provided by the transmitter manufacturer.
Set Up the Transmitter: Configure your RC transmitter with the appropriate settings for the M2 Evo. This includes setting up channels, adjusting endpoints, and ensuring that the transmitter is in the correct mode (mode 1 or mode 2).
Calibrate the Gyro and Flight Controller: Before your first flight, calibrate the gyro and flight controller as per the manufacturer’s guidelines. This step is crucial for ensuring the stability and performance of your helicopter.
Safety Check: Always perform a safety check to make sure all parts are secure, and the controls are functioning correctly. Ensure there are no loose parts, and all screws and connections are tight.
Choose a Suitable Flying Location: Select an open and safe area for your first flights. Avoid flying near people, buildings, or obstacles. Ensure there is enough space to maneuver safely.
Test Flight: Start with gentle, low-altitude flights to get a feel for the helicopter’s controls. Gradually build up to more advanced maneuvers as you become more comfortable with the M2 Evo.
Maintenance and Upkeep: Regularly inspect and maintain your helicopter to ensure it stays in good working condition. Clean it, check for loose parts, and replace any damaged components as needed.
Remember, setting up and flying an RC helicopter, especially one with advanced features like the OMP Hobby M2 Evo, can take time to master. It’s essential to read the user manual thoroughly, take things slowly, and seek guidance from experienced RC enthusiasts if you’re a beginner. Always prioritise safety, and enjoy the exciting world of RC helicopter flying!
info
Out of the box… OMPHobby does a great job, the helicopter is perfectly setup! just replace all parts and adjust again all linkages. No need to alter the flight behaviour by changing flight controller previous values.
![]()
tip
If you’re unsure or uncomfortable making these adjustments, consider seeking assistance from an experienced RC helicopter pilot or hobby shop.
Correct helicopter drifting while hovering (self leveling calibration flight)
DO NOT try to correct drift using servo setup mode. that’s not what it’s meant for. Servo setup mode is for levelling the swash and setting zero pitch!
Symptoms:
- Helicopter is forward/backward drifting,
- Helicopter is drifting to the left or right,
- Hovering is not stable
You have to:
- Switch Heli on, throttle down.
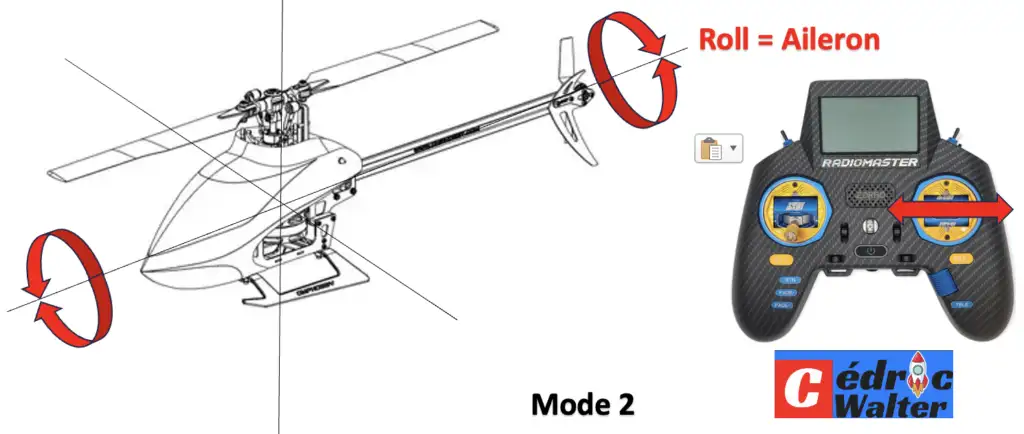
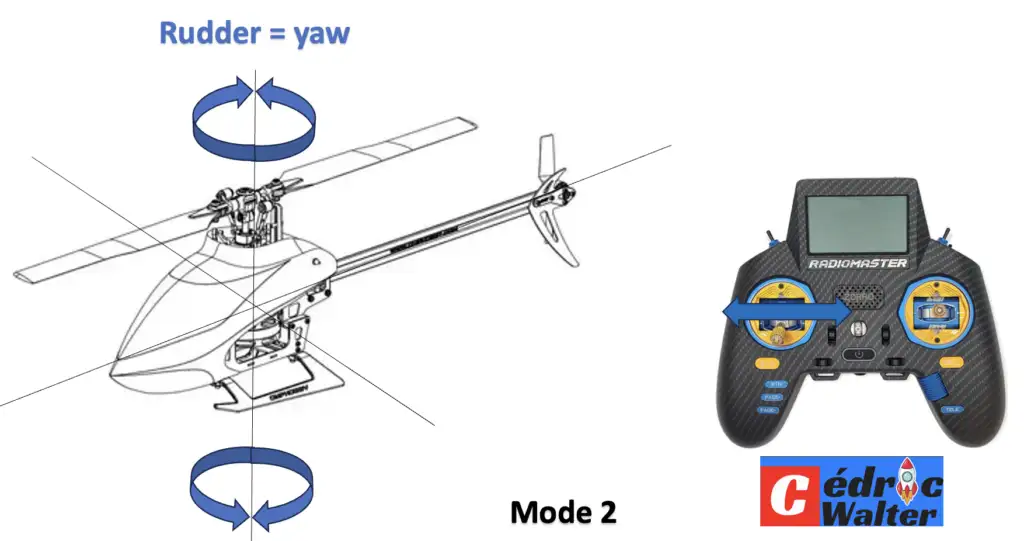
- Put Aileron (right stick down for most of us using Mode 2) down on the controller for ~5 seconds until the red LED blinking from flight board.
- Hover and try to make it as steady as possible and land.
- Once landed hold Aileron down again for ~5 seconds until red LED stops blinking. Setting is now saved.
This will fix drifting issues in both stability/6G mode, and non-stabilized/3D flight modes, BUT you have to be in stability mode to do the process.
After a crash
warning
Do not try to save a few $, replace all parts that are damaged. If not the risk of injury or immediate crash is just higher
Replace the tail motor
- Unmount and replace the tail rotor
- Verify the direction of rotation
Adjusting your ESC end points
Why it is important to set your ESC end points
Adjusting the end points on the Electronic Speed Controller (ESC) of an RC helicopter is important for several reasons:
- Throttle Calibration: Properly adjusting the ESC endpoints ensures that the throttle response of your RC helicopter is accurate and proportional. When you calibrate the endpoints correctly, you can achieve a smoother and more linear power delivery, which is essential for stable and predictable flight.
- Safety: Throttle calibration through endpoint adjustment enhances safety. It helps prevent sudden, unexpected increases or decreases in motor speed, reducing the risk of accidents, especially during takeoff, landing, or maneuvers where precise control is crucial.
- Tail Rotor Control: In RC helicopters, the throttle and motor speed are closely tied to the tail rotor control. If the throttle is not properly calibrated, it can lead to inconsistencies in tail rotor response and result in heading drift or instability during flight.
- Battery Efficiency: Correct endpoint adjustment can help optimize battery efficiency. By ensuring that the motor speed matches the throttle stick input accurately, you can maximize the flight time and performance of your RC helicopter.
- Aerobatics: When performing aerobatic maneuvers, precise throttle control is critical. Accurate endpoints enable you to control the motor speed with greater precision, which is essential for executing maneuvers like loops, rolls, and flips.
- Learning and Skill Development: As you progress in your RC helicopter piloting skills, you may need to adjust the endpoints to match your flying style and specific helicopter setup. Beginners may prefer a more forgiving throttle response, while experienced pilots may require a more precise and responsive setup.
- Preventing Overheating: Inaccurate endpoints can lead to the motor running at higher or lower RPMs than desired, potentially causing overheating or excessive wear and tear. Proper calibration helps ensure the motor operates within safe and optimal temperature ranges.
How to adjust the ESC end points
warning
Before changing any Flight controller settings ensure that the Helicopter is bound to the radio and throttle cut is active. It is recommended to remove the main and tail rotor blades to prevent any injury if the motors accidentally start up.
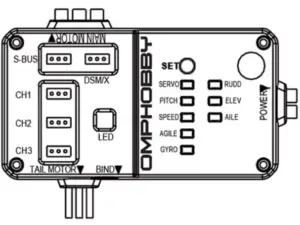
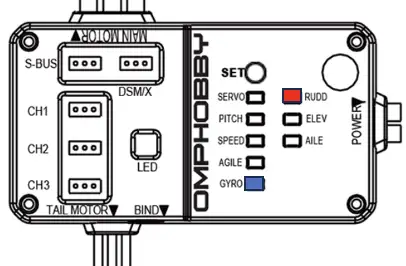
The Flight controller is configured with a combination of SET button presses and Radio controller stick movements.
Move throttle stick to 100% and power on helicopter. Once the controller is initialised (swash plate jumps) move throttle to 0% Your ESC end points are now set and you can power off the helicopter.
Adjusting the servo mid-point
Why it is important to set servo mid-point
Adjusting the servo mid-point on a remote-controlled (RC) helicopter is important for several reasons:
- Control Center: Servos are responsible for controlling various aspects of the helicopter, such as the swashplate, tail rotor, or other functions. The servo mid-point sets the neutral or center position for these servos. Correctly adjusting the servo mid-point ensures that the helicopter starts from a balanced and centered position when you power it up.
- Trimming: Proper servo mid-point adjustment is essential for trimming the helicopter’s controls. When the servos are centered correctly, it’s easier to achieve a stable hover, and the helicopter responds predictably to your control inputs. If the servos are not centered, you may have to apply constant input to keep the helicopter stable, leading to unnecessary pilot workload.
- Stability: A well-adjusted servo mid-point contributes to the helicopter’s overall stability. If the servos are not correctly centered, it can lead to unwanted drift, oscillations, or instability during flight. Centered servos provide a solid starting point for flight control adjustments.
- Precision Maneuvers: When performing precision maneuvers or aerobatics, having correctly centered servos is critical. It allows for precise control of the helicopter’s movements and ensures that it responds predictably during rolls, flips, loops, and other advanced maneuvers.
- Tail Rotor Control: The tail rotor servo is especially sensitive to the servo mid-point. Correctly setting the mid-point for the tail rotor servo ensures that the helicopter maintains a stable heading and effectively counters the main rotor’s torque.
- Reducing Stress on Servos: If the servos are not properly centered, they may constantly work against each other, leading to increased wear and tear and reduced servo lifespan. Centered servos reduce unnecessary stress and extend the lifespan of the components.
- Learning and Skill Development: Adjusting the servo mid-point can also be helpful as pilots progress in their skill level. Beginners may start with factory settings for simplicity, while more experienced pilots may fine-tune the mid-points to match their flying style and specific helicopter setup.
- Aiding Setup and Maintenance: When building or maintaining an RC helicopter, having correctly centered servos simplifies the setup process. It ensures that the helicopter is mechanically balanced and ready for fine-tuning and calibration.
In summary, adjusting the servo mid-point on an RC helicopter is crucial for achieving precise control, stability, and performance. It serves as a starting point for many other adjustments and helps ensure that the helicopter responds predictably to pilot inputs, ultimately enhancing the flying experience and safety.
How to adjust the servo mid-point
warning
Before changing any Flight controller settings ensure that the Helicopter is bound to the radio and throttle cut is active. It is recommended to remove the main and tail rotor blades to prevent any injury if the motors accidentally start up.
The Flight controller is configured with a combination of SET button presses and Radio controller stick movements.
Adjusting the servo mid-point on an RC helicopter involves making precise mechanical adjustments to the servo arms and linkages. Here’s a general step-by-step guide to help you adjust the servo mid-points:
Tools and Materials Needed:
- Hex wrenches or screwdrivers
- Servo arm/horn adjuster or servo centering tool (optional but helpful)
- A level surface
- Knowledge of your RC helicopter’s manual and components
Procedure:
Read the Manual: Always refer to your specific RC helicopter’s manual for guidance on servo mid-point adjustment. The manual will provide information on your helicopter’s setup and specifications.
Power Off: Ensure that the helicopter’s power is turned off and the transmitter is disconnected to prevent accidental movements of the servos during the adjustment process.
Level Surface: Place your RC helicopter on a level surface. This ensures that the helicopter is in a neutral orientation, which is crucial for accurate servo mid-point adjustment.
Access Servos: Depending on your helicopter’s design, you may need to remove covers or panels to access the servo arms.
Center Servo Arms: To center you servo you can either:
Power up the heli but keep the radio off
Using a servo arm adjuster or servo centering tool (if available), set the servo arms to their center position. If you don’t have these tools, you can manually center the servo arms as closely as possible by aligning them with the servo case and ensuring that they are parallel to the helicopter’s frame.
Adjust Linkages: To fine-tune the servo mid-points, you may need to adjust the linkages connecting the servo arms to the control surfaces (e.g., swashplate, rotor blades). This can involve adjusting the lengths of pushrods or turnbuckles. Many helicopters have threaded linkages, so you can use hex wrenches or screwdrivers to make these adjustments.
Check Control Surface Alignment: As you make adjustments, regularly check that the control surfaces are properly aligned and that the swashplate is level.
Test and Refine: Once you’ve made adjustments, power on the helicopter and the transmitter. With the transmitter stick at neutral, check that the servos return to their centered positions. If not, make further adjustments to the linkages or servo arms until you achieve the desired mid-point. Test for smooth and consistent control response.
Repeat for All Servos: You’ll typically have to perform this process for all relevant servos on your RC helicopter, including cyclic servos, collective pitch servos, and the tail rotor servo.
Final Check: After making all the adjustments, double-check that the helicopter maintains its level position when the transmitter sticks are at neutral. Also, ensure that control inputs result in smooth and precise movements.
Secure and Reassemble: Once you’re satisfied with the servo mid-points, secure the linkages, servo arms, and any covers or panels that you removed. Make sure everything is properly fastened.
Test Flight: Conduct a test flight to ensure that the helicopter is stable and responsive after the adjustments. Fine-tune as needed.
Remember that the specifics of servo mid-point adjustment may vary depending on your helicopter’s make and model, so always consult your manual and follow manufacturer recommendations. If you’re unsure or uncomfortable making these adjustments, consider seeking assistance from an experienced RC helicopter pilot or hobby shop.
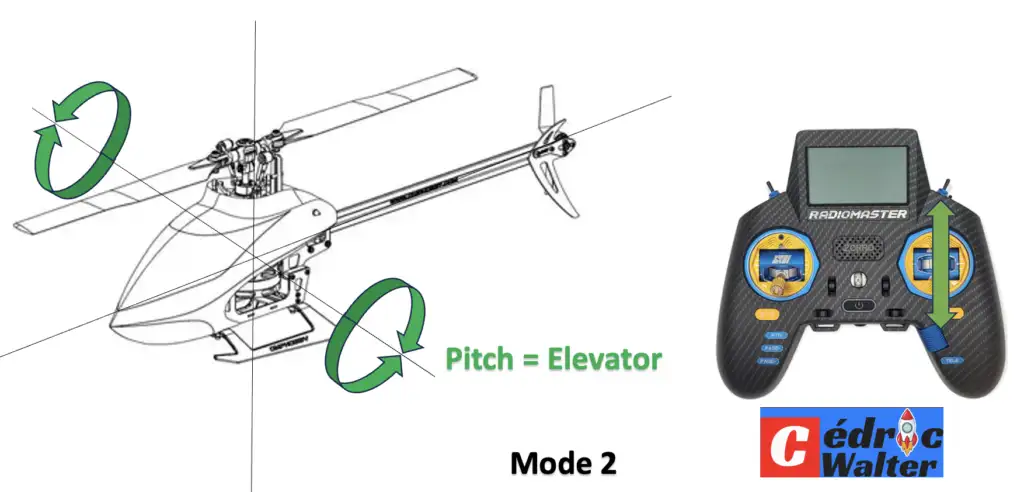
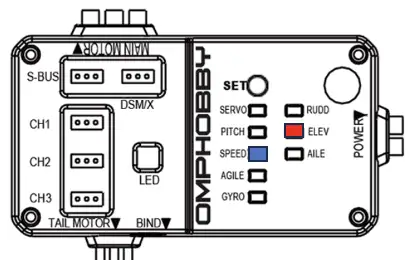
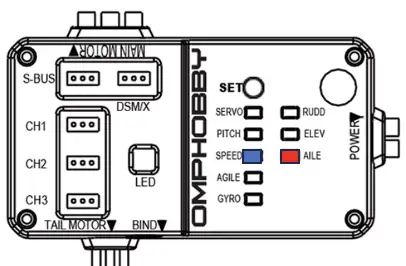
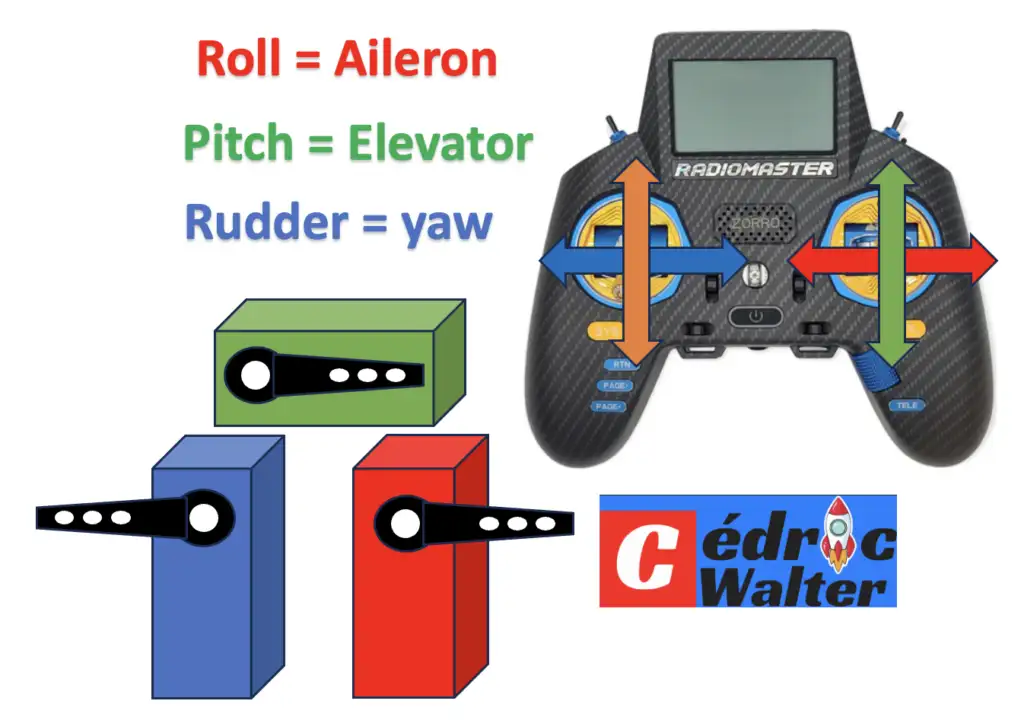
Pitch Settings
You can control the Elevator behaviour:
- SPEED: This controls the maximum rotation rate (SPEED).
- AGILE: This controls the Agility. How quickly the helicopter reacts to change in stick input.
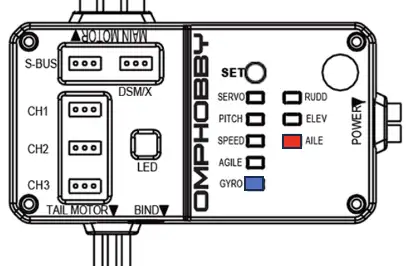
- GYRO: This controls the Gyro Gain for Elevator axe.
| Parameter | Setting | Setting range | M2 V2/EXPSuggested Value | M2 EVOSuggested Value |
|---|---|---|---|---|
| Elevator | Speed | 1-9 | 4 | 4 |
| Agility | 1-9 | 5 | 6 | |
| Gyro | 1-9 | 3 | 3 |
Recommended pitch settings values and range.
Why it is important to set pitch rate settings
Adjusting the pitch rate setting on a remote-controlled (RC) helicopter is important for several reasons:
- Flight Control: Pitch control is crucial for changing the helicopter’s attitude and direction. By adjusting the pitch rate, you can control how quickly the helicopter tilts forward or backward. This is essential for maintaining stability and achieving the desired flight path.
- Stability: Proper pitch control helps in stabilizing the helicopter during flight. If the pitch rate is too high, the helicopter might become too responsive and difficult to control, potentially leading to crashes. On the other hand, if it’s too low, the helicopter may not respond quickly enough to your inputs, leading to unresponsiveness and difficulty in maneuvers.
- Aerobatics: Many RC helicopter enthusiasts enjoy performing aerobatic manoeuvres, such as loops, rolls, and flips. Adjusting the pitch rate is necessary to execute these maneuvers effectively. Higher pitch rates are usually required for advanced aerobatics.
- Wind Conditions: Wind can significantly affect an RC helicopter’s flight. By adjusting the pitch rate, you can compensate for varying wind conditions. In windy conditions, a higher pitch rate can help the helicopter maintain stability and control.
- Learning and Skill Development: As you progress in your RC helicopter piloting skills, you may need to adjust the pitch rate to match your abilities and preferences. Beginners might start with lower pitch rates to have more stable and forgiving flights, while experienced pilots may opt for higher rates to perform advanced maneuvers.
- Battery Life: Adjusting the pitch rate can also impact the helicopter’s power consumption. Higher pitch rates typically require more power, which can drain the battery more quickly. Adjusting the pitch rate can help you find a balance between performance and flight duration.
- Tail Rotor Compensation: The pitch rate can also affect how the tail rotor compensates for the torque generated by the main rotor. Adjusting the pitch rate can help maintain a steady heading during flight.
In summary, adjusting the pitch rate setting on an RC helicopter is vital for achieving the desired level of control, stability, and performance during flight. It allows pilots to tailor the helicopter’s behavior to their skill level, environmental conditions, and flying preferences.
How to adjust the pitch rate on the flight controller
warning
Before changing any Flight controller settings ensure that the Helicopter is bound to the radio and throttle cut is active. It is recommended to remove the main and tail rotor blades to prevent any injury if the motors accidentally start up.
The Flight controller is configured with a combination of SET button presses and Radio controller stick movements.
Press the set key for 3 seconds. click set key until “elev” light is on and speed light flashes. when the speed light flashes 5 times it indicates factory default pitch rate. Move the elevator stick up and down to increase or decrease the pitch rate setting. the amount of flashes indicates the level, 1 being the lowest to 9 being the highest. after the desired level is achieved, press the set key for 3 seconds to save the setting.
| Parameter | Setting | Setting range | M2 V2/EXPSuggested Value | M2 EVOSuggested Value |
|---|---|---|---|---|
| Elevator | Speed | 1-9 | 4 | 4 |
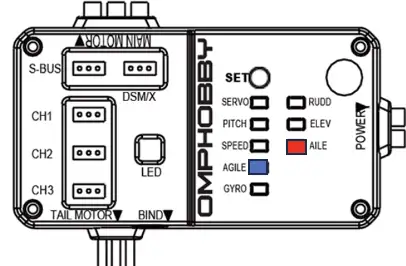
Adjust pitch agility (known as cyclic pitch)
Why it is important to set cyclic pitch
“cyclic pitch,” which refers to the adjustment of the pitch angle of the helicopter’s rotor blades during flight. Adjusting cyclic pitch is indeed important in RC helicopters for several reasons:
- Flight Control: Cyclic pitch control is crucial for changing the attitude and direction of the RC helicopter. It allows you to control how much the rotor blades tilt forward, backward, left, or right. Proper adjustment of cyclic pitch is essential for maintaining stability and achieving the desired flight path.
- Agility and Responsiveness: Cyclic pitch adjustments directly affect the agility and responsiveness of the helicopter. Higher cyclic pitch settings result in more aggressive and nimble flight characteristics, making it easier to perform acrobatic maneuvers and rapid changes in direction.
- Stability: While increased agility is desirable for advanced flying, it can also make the helicopter less stable if not properly adjusted. Pilots often find a balance by adjusting cyclic pitch to match their skill level and flying preferences, optimizing stability while still allowing for aerobatic maneuvers.
- Aerobatics: Adjusting cyclic pitch is crucial for executing aerobatic maneuvers, such as loops, rolls, flips, and other advanced acrobatics. By changing the pitch angle of the rotor blades, you can control the helicopter’s orientation during these maneuvers.
- Wind Compensation: In windy conditions, cyclic pitch adjustments can help counteract the effects of the wind and maintain stable flight. By adjusting the pitch, you can make the helicopter more resistant to wind-induced disturbances.
- Learning and Skill Development: As pilots gain experience, they may adjust cyclic pitch to match their skill level. Beginners often start with lower pitch settings for more stable and forgiving flights, while experienced pilots use higher settings for more responsive and agile control.
- Battery Life: It’s worth noting that higher cyclic pitch settings can consume more power, potentially reducing the helicopter’s flight duration. Pilots must find a balance between performance and flight time, depending on their specific goals.
In summary, adjusting cyclic pitch, which affects the helicopter’s agility and responsiveness, is important for achieving precise control, stability, and performance in RC helicopters. It allows pilots to customize the helicopter’s behavior to their skill level, flying style, and the demands of their flying environment.
warning
Before changing any Flight controller settings ensure that the Helicopter is bound to the radio and throttle cut is active. It is recommended to remove the main and tail rotor blades to prevent any injury if the motors accidentally start up.
The Flight controller is configured with a combination of SET button presses and Radio controller stick movements.
How to adjust the pitch agility on the flight controller
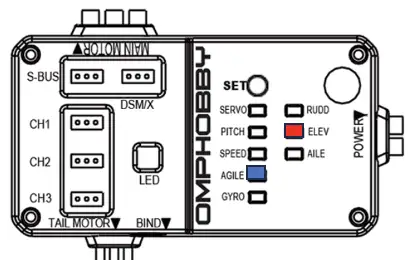
Press the set key for 3 seconds. click set key until elev light is on and agile light flashes. when the agile light flashes 5 times it indicates factory default pitch agility. move the elevator stick up and down to increase or decrease the agility setting.the amount of flashes indicates the level, 1 being the lowest to 9 being the highest. after the desired level is achieved, press the set key for 3 seconds to save the setting.
| Parameter | Setting | Setting range | M2 V2/EXPSuggested Value | M2 EVOSuggested Value |
|---|---|---|---|---|
| Elevator | Speed | 1-9 | 4 | 4 |
Recommended pitch agility values and range.
Adjusting the pitch gain setting
TODO
How to adjust the pitch gain on the flight controller
Press the set key for 3 seconds. click set key until elev light is on and agile light pitch gain setting.
To adjust flight controller settings, press the set key for 3 seconds. click set key until elev light is on and gyro light flashes. when the gyro light flashes 5 times it indicates factory default pitch gain. move the elevator stick up and down to increase or decrease the gain setting.
The amount of flashes indicates the level, 1 being the lowest to 9 being the highest. after the desired level is achieved, press the set key for 3 seconds to save the setting.
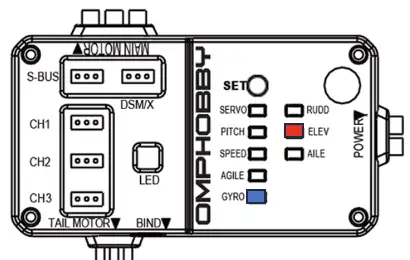
Parameter
| Parameter | Setting | Setting range | M2 V2/EXPSuggested Value | M2 EVOSuggested Value |
|---|---|---|---|---|
| Elevator | Gyro | 1-9 | 3 | 3 |
Recommended pitch gain values and range.
Aileron / Roll setting
You can control the Aileron behaviour:
- SPEED: This controls the maximum rotation rate (SPEED).
- AGILE: This controls the Agility. How quickly the helicopter reacts to change in stick input.
- GYRO: This controls the Gyro Gain for Aileron axe.
TODO
Adjusting the Aileron speed setting
TODO
How to adjust the aileron speed on the flight controller
| Parameter | Setting | Setting range | M2 V2/EXPSuggested Value | M2 EVOSuggested Value |
|---|---|---|---|---|
| Aileron | Speed | 1-9 | 4 | 4 |
Adjusting the Aileron agility setting
TODO
How to adjust the aileron agility on the flight controller
TODO
| Parameter | Setting | Setting range | M2 V2/EXPSuggested Value | M2 EVOSuggested Value |
|---|---|---|---|---|
| Aileron | Agility | 1-9 | 4 | 6 |
Adjusting the Aileron gain setting
TODO
How to adjust the aileron gain on the flight controller
TODO
| Parameter | Setting | Setting range | M2 V2/EXPSuggested Value | M2 EVOSuggested Value |
|---|---|---|---|---|
| Aileron | Gyro | 1-9 | 3 | 3 |
Rudder / Yaw setting
You can control the Rudder behaviour:
- SPEED: This controls the maximum rotation rate (SPEED).
- AGILE: This controls the Agility. How quickly the helicopter reacts to change in stick input.
- GYRO: This controls the Gyro Gain for Rudder/Yaw axe.
Adjusting the yaw rate setting
Why it is important to set yaw rate settings
Adjusting the yaw rate setting on a remote-controlled (RC) helicopter is important for several reasons:
- Directional Control: Yaw control is essential for changing the orientation or direction the helicopter is facing. By adjusting the yaw rate, you can control how quickly the helicopter rotates around its vertical axis. This is crucial for maintaining control over the helicopter’s heading.
- Heading Corrections: In flight, various factors like wind and torque generated by the main rotor can cause the helicopter’s heading to change unintentionally. Adjusting the yaw rate setting allows you to make corrections quickly to maintain the desired heading.
- Stabilization: Proper yaw control helps stabilize the helicopter during flight. Without effective yaw control, the helicopter can become difficult to manage, leading to unstable flight and potential crashes.
- Aerobatics: Yaw control is also crucial for performing aerobatic maneuvers. Many advanced maneuvers, such as pirouettes and inverted flight, rely on precise and rapid yaw adjustments. Adjusting the yaw rate can make these maneuvers easier to execute.
- Tail Rotor Compensation: In RC helicopters, the tail rotor is responsible for counteracting the torque produced by the main rotor. Adjusting the yaw rate can impact how the tail rotor compensates for this torque. A well-tuned yaw rate ensures that the helicopter maintains stable and controlled heading throughout various flight conditions.
- Wind Compensation: Yaw control is particularly important in windy conditions. Wind can affect the helicopter’s heading, and you’ll need to adjust the yaw rate to counteract these external influences.
- Learning and Skill Development: As with pitch and roll controls, the yaw rate can be adjusted to match the pilot’s skill level and preferences. Beginners may start with lower yaw rates for easier control, while experienced pilots may opt for higher rates to perform complex maneuvers.
- Battery Life: Similar to pitch and roll control, adjusting the yaw rate can also affect power consumption. Higher yaw rates typically require more power, so pilots may need to find a balance between performance and flight duration.
In summary, adjusting the yaw rate setting on an RC helicopter is crucial for achieving precise control, maintaining heading stability, and accommodating various flight conditions. The ability to modify the yaw rate allows pilots to customise the helicopter’s behaviour to their skill level and the demands of the flight environment.
How to adjust the yaw rate on the flight controller
warning
Before changing any Flight controller settings ensure that the Helicopter is bound to the radio and throttle cut is active. It is recommended to remove the main and tail rotor blades to prevent any injury if the motors accidentally start up.
The Flight controller is configured with a combination of SET button presses and Radio controller stick movements.
TODO
| Parameter | Setting | Setting range | M2 V2/EXPSuggested Value | M2 EVOSuggested Value |
|---|---|---|---|---|
| Rudder | Speed | 1-9 | 3 | 3 |
Adjusting the yaw gain
Why it is important to set yaw gain
Adjusting the yaw gain setting on a remote-controlled (RC) helicopter is important for several reasons:
- Tail Rotor Control: The yaw gain setting affects the responsiveness of the tail rotor, which is responsible for controlling the helicopter’s yaw or heading. A well-adjusted yaw gain ensures that the tail rotor responds appropriately to your input, helping to maintain stable and precise directional control.
- Heading Hold: Many RC helicopters are equipped with a “heading hold” or “gyro” feature. This feature relies on the yaw gain to maintain the helicopter’s heading. Proper adjustment of the yaw gain helps the helicopter hold its heading more accurately, especially during maneuvers or windy conditions.
- Stability: Correctly setting the yaw gain contributes to the overall stability of the helicopter. A properly tuned tail rotor system with the right gain setting helps prevent tail wag, which can negatively impact flight stability and control.
- Yaw Rate Control: The yaw gain affects how quickly the tail rotor reacts to yaw input from the pilot. Adjusting the yaw gain allows you to fine-tune the helicopter’s yaw rate, providing you with the level of responsiveness and precision you desire for your flying style and the specific flight conditions.
- Aerobatics: The yaw gain setting is particularly important when performing aerobatic maneuvers that require precise yaw control, such as pirouettes and autorotations. By adjusting the yaw gain, you can tailor the helicopter’s behavior to meet the demands of these maneuvers.
- Wind Compensation: Yaw control is essential in windy conditions, as wind can cause the helicopter’s heading to drift. The yaw gain can be adjusted to optimize the tail rotor’s response to wind, helping to maintain heading stability.
- Learning and Skill Development: As with other control settings in RC helicopters, the yaw gain can be adjusted to match the pilot’s skill level and preferences. Novice pilots may start with lower gains for more forgiving and stable flight, while experienced pilots can use higher gains for greater precision and responsiveness.
- Tail Vibration Control: Adjusting the yaw gain can also help reduce tail rotor vibrations, which can affect the overall smoothness and performance of the helicopter.
In summary, adjusting the yaw gain setting on an RC helicopter is vital for achieving precise control, stability, and responsiveness in controlling the helicopter’s heading. Tail rotor control is critical to maintaining stability and executing various maneuvers, and fine-tuning the yaw gain allows pilots to optimize the helicopter’s behavior for their skill level and specific flight conditions.
How to adjust the yaw gain on the flight controller
warning
Before changing any Flight controller settings ensure that the Helicopter is bound to the radio and throttle cut is active. It is recommended to remove the main and tail rotor blades to prevent any injury if the motors accidentally start up.
The Flight controller is configured with a combination of SET button presses and Radio controller stick movements.
TODO
| Parameter|Setting|Setting range|M2 V2/EXPSuggested Value|M2 EVOSuggested Value| |:—-|:—-|:—-|:—-|:—-| | Rudder|Gyro|1-9|3|4|
How to get the swashplate leveled / servo trim
On a levelled table, turn off self leveling by going in 3D mode.
- Center your collective pitch stick and don’t touch it or the helicopter.
- Look at all 3 servo arms. Are they EXACTLY 90° level to the helicopter body?
- If they are off by a lot (shouldn’t be the case) you can try removing the servo arm and re-installing it. Maybe it’ll be better on tooth off from how it currently is but it’s unlikely to be that far off from the factory.
- If the servo arms are off center just a little bit use servo trim on the controller to get all 3 servos as close as you can to perfectly centered. Press 3 s on set. press set again to move to servo settings. use sticks to center.
Once the servos are centered adjust the linkages (length or shorten) from the servos to the swashplate so it’s level. Jiggle the collective and cyclic sticks and then re-center the collective stick to check your work.
Preventive maintenance
Performing preventive maintenance on your RC helicopter can help ensure its longevity and optimal performance. Here are some key areas where you can apply preventive maintenance:
Rotor Blades: Regularly inspect rotor blades for any signs of damage, such as cracks or chips. Check for balance and adjust if necessary. Ensure that blades are securely attached.
Main Gear and Motor Pinion: Inspect the main gear and motor pinion for wear or damage. Lubricate gears if needed. Ensure proper alignment.
Battery and Power System: Check the battery for any signs of swelling or damage. Inspect power connectors and wires for wear or fraying. Verify proper voltage and capacity.
Frame and Body: Inspect the frame for cracks or damage. Check the body for loose or broken parts. Ensure that all screws and bolts are tight.
Tail Rotor and Servo: Inspect the tail rotor blades for damage. Check the tail rotor servo for proper operation. Ensure the tail rotor is securely attached.
Linkages and Swashplate: Inspect linkages for wear or damage. Check the swashplate for proper movement. Lubricate moving parts if necessary.
Electronic Components: Check the receiver and transmitter for proper function. Inspect electronic speed controllers (ESCs) and other onboard electronics. Ensure proper antenna placement for optimal signal reception.
Landing Gear: Check the landing gear for any signs of damage. Ensure that it provides stable support.
Screws and Fasteners: Regularly check all screws and fasteners for tightness. Consider using thread locker to prevent vibrations from loosening screws.
Gyro and Flight Controller: Inspect the gyro for proper function. Ensure that the flight controller settings are calibrated correctly.
Bearings: Check all bearings for smooth operation. Replace bearings that show signs of wear or rough movement.
Cleanliness: Keep your RC helicopter clean from dirt and debris. Use compressed air or a brush to remove dust and particles.
Controler
TALY? Around August 2020 OMP added a feature called TALY which much improved left yaw authority If you want to check open the flight controller case and check the version number of the ESC. V4 ESC has TALY, anything earlier doesnt.
Resources
Forums
https://www.helifreak.com/forumdisplay.php?f=563
EdgeTX files for M1 EVO & M2 EVO Helicopters
tip
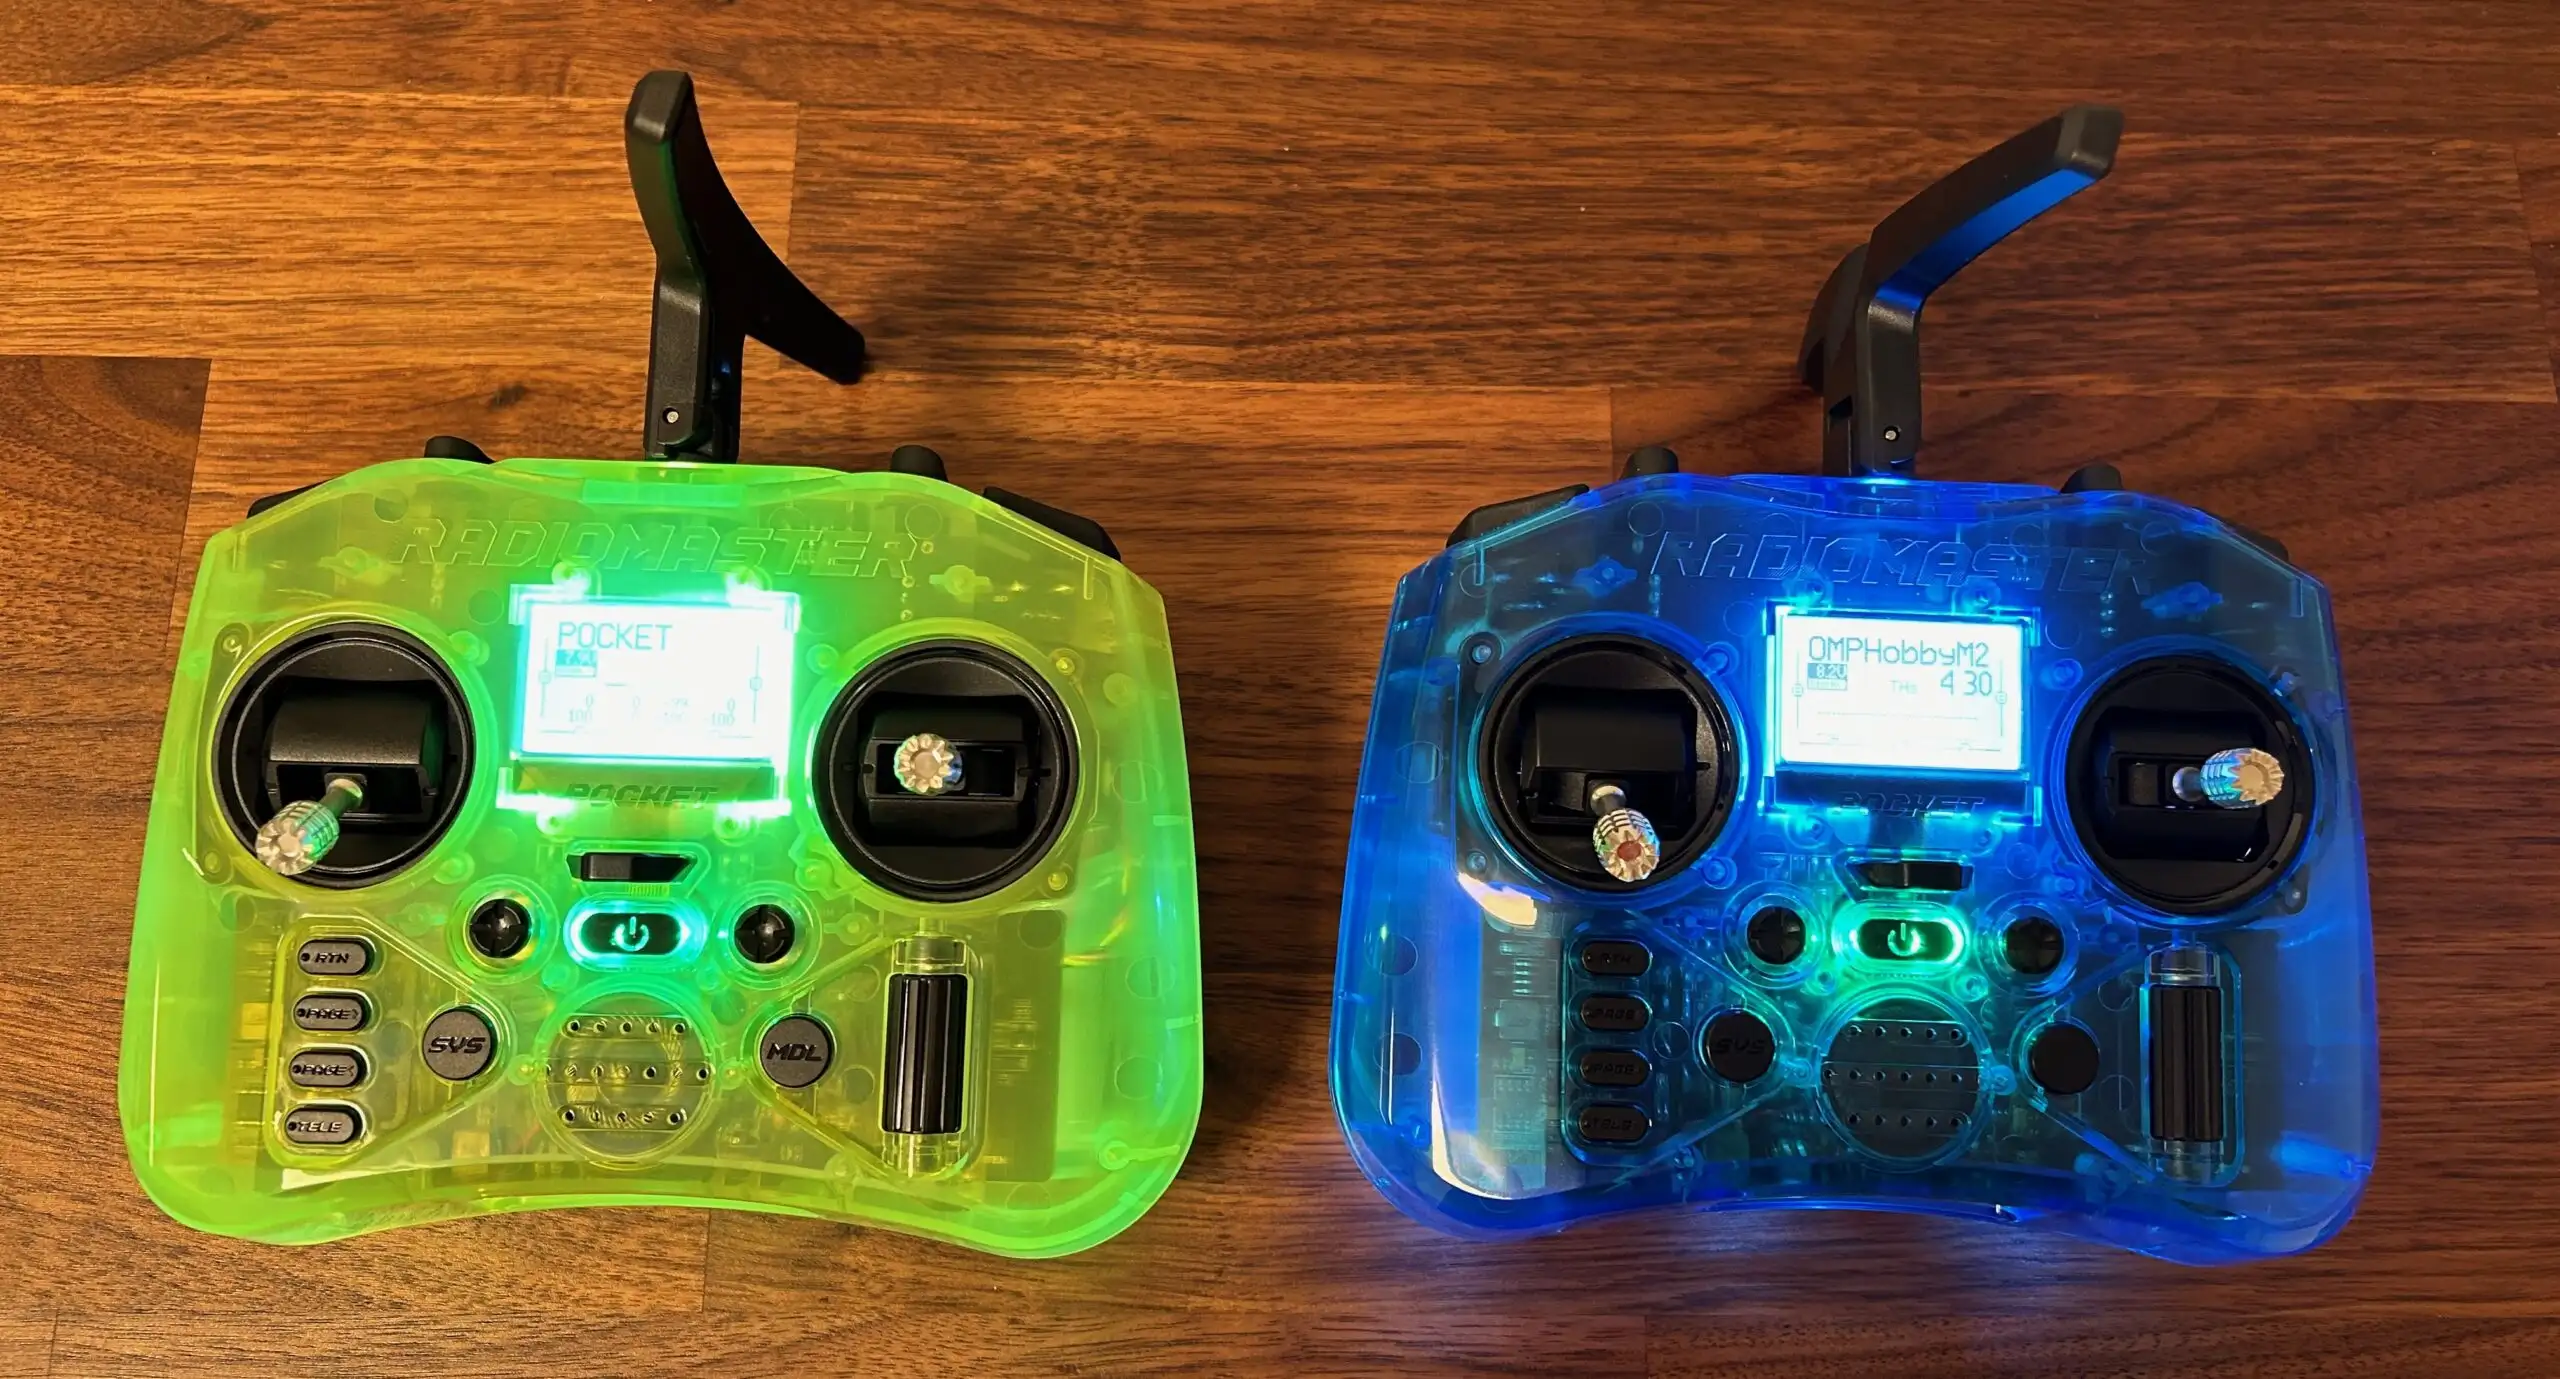
I recommend you to use the omphobby protocol, support telemetry and work great with a 4 in 1 radiomaster multi module.
Jonas setup
info
Jonas’ programming rescue mode waits for the heli to upright, then applies a known positive pitch to climb (with the amount of applied pitch being dependent on flight mode). OMPHobby EVO radio files for Radiomaster Zorro and TX16S, for both SFHSS and DSM2/X satellites. https://www.helifreak.com/showthread.php?t=916037
Important things to note
- Files may be updated without notice if issues are found or when I find ways to optimize them further.
- These setups are provided as-is, should be understood as a recommendation and may not suit everyone.
- I assume no liability for the things you do with your helicopters using my setups.
- Check all flight controls, functions and switches without blades before your first flight.
- I cannot provide individual support for these setup files. Especially for installation instructions, Google is your friend.
- These setup files require EdgeTX 2.7.0 or newer to function. I can not and will not provide OpenTX files.
- Choose the correct setup file for your receiver type. Simply changing the receiver type in the radio WILL NOT WORK.
Find them here: Jonas’ OMPHobby M1/M2 EVO EdgeTX Files
Analyzing the setup
Channel Function Direction 1 Aileron (Inverted) 2 Elevator 3 Throttle 4 Rudder (Inverted) 5 Stability mode (ON/OFF) 6 Collective Pitch
Flight modes are used: RPM, Pitch and Rescue Pitch are different in the main 3 Flightmodes, the 6POS even lowers the low-RPM Flightmode’s RPM further.
In EdgeTX, the “input” (stick positions) from the sticks travels to the RF channel output (signal out the RF module) like this: Sticks (hardware) ⇒ Inputs (config) ⇒ Mixer (config) ⇒ Outputs (config) ⇒ RF module (hardware)
Logical switches
Freely assignable switches through Logical Switches menu
L04: Switch F -> throttle hold L04: Switch E -> throttle hold L08 : reset timer, throttle hold, SE & SF
Curves
HLD: curve that maintain the throttle at 0 CP1: collective pitch curve for normal mode with pitch -100 to 100 CP3: collective pitch curve for idle-up 1 with pitch -95 to 95 CP3: collective pitch curve for idle-up 2 with pitch -90 to 90
CPL: collective pitch curve beginner friendly (no negative collective) with self level mode and reduced rates
DBD: dead band curve Deadband was adressed in a 5POS-Curve for aileron and elevator saying -100=-100, -1=-8, 0=0, 1=8, 100=100. Therefor -7 to 7 is skipped. Jonas dealt with the deadband by mixing “ail” and “ele” with the curve “dbd”
Add a deadband removal curve then coutereact that by adding positive expo… because with the combination of the two is taking out the deadband first, so that even the slightest stick input from 0 results in a rotation of the helicopter, and then reshaping the resulting curve beyond the deadband so that a certain amount of stick travel, even beyond the deadband, results in a rotation rate that is comfortable for the pilot.
Deadband negates the first 5% of your input completely, Expo reshapes the entire control curve for more lenient or aggressive rotation rate for a given input.
Features *
- Deadband fix preapplied, expo ready (set expo in Mixes tab)
- Three flight modes with dedicated collective curves
- Custom rescue mode with flight mode dependent collective curves
- Zorro: RPM reduction switch intelligently combined with self level switch to enable additional headspeeds
- TX16S: 6-pos switch allows for 5 additional, lower RPMs in lowest headspeed setting
- Dual throttle hold switch for safety with timer reset function if both switches are pulled
Default switch assignments
Zorro:
- A: Rescue button
- B: Flight mode switch (3 fixed RPMs)
- C: 3D mode headspeed switch reduction, self leveling with headspeed reduction
- D: N/A
- E: Throttle hold switch 1
- F: Throttle hold switch 2
- G: N/A
- H: N/A
TX16S:
- SA: Throttle hold switch 1
- SB: N/A
- SC: Self level switch
- SD: N/A
- SE: Flight mode (3 fixed RPMs)
- SF: Throttle Hold switch 2
- SG: N/A
- SH: Rescue
- 6 Pos Buttons: Lowers lowest RPM further in 5 steps
M1 EVO Recommended FBL Setup
RUDD
- Speed 5
- Gyro 4
- ELEV
- Speed 5
- Agile 3
- Gyro 3
AILE
- Speed 5
- Agile 3
- Gyro 4
Collective Pitch
- ±14.5°
M2 EVO Recommeneded FBL Setup
RUDD
- Speed 5
- Gyro 4
- ELEV
- Speed 5
- Agile 6
- Gyro 3
AILE
- Speed 5
- Agile 6
- Gyro 3
Collective Pitch
- Default
Use ELRS
see https://originhobbies.com/de/expresslrs-sbus-with-omphobby-m1-m2-helicopter/
Manuals
- OMP M2 EVO User Manual
- M2 Flight Controller User Guide
- OriginHobbies RTF User guides (TX12 / TX16S / Zorro / Boxer)
- Radio Setup guides for OMP M1 & M2 EVO (TX12 / TX16S / Zorro / Boxer / Futaba T18SZ)
- OMP M2 EVO Spare Parts list
- External receiver options for OMPHobby M2 EVO
- ExpressLRS SBUS with OMPHobby M2 EVO
Support me
Disclaimer
info
The links to products provided here are my affiliate links. If you order products using those links, there will be no price increase, but I will receive a certain commission on each sales from those links in this description. This commission income supports me and help me continue to run and manage this blog.
